For various reasons, I moved most of my content here to my new website hosted at sanderman01.github.io.
If you have any links or bookmarks pointing to here, then you should consider updating those.
For various reasons, I moved most of my content here to my new website hosted at sanderman01.github.io.
If you have any links or bookmarks pointing to here, then you should consider updating those.
Just a few weeks ago, a new update to iO was released, which added a whole bunch of new levels! There’s also a new trailer:
Available on: Steam, Apple Appstore and Google Play
(Gotta keep plugging)
In light of that event, I thought it was time to write another post about the development process of iO. Occasionally I’ll get questions from people on the thought process behind these levels. So this time I’ll be talking about the subject of level design.
Let me first start with a small disclaimer. Most of the levels in the game were not designed by myself. I was very heavily involved in the game design prototyping in early stages of development of the game, and later on I was pretty much The Programmer Guy whose task was getting the thing to work smoothly and without bugs on all platforms. As a result I did not spend much time on the levels themselves in the later stages of development. That said. I do believe I laid a lot of the conceptual ground work for some of the most interesting levels currently in the game.
Note also, that the process I describe here may not be suitable for all games or developers. This is simply what worked for me, on this project.
Before I delve in the process of level design itself, bear with me as I want to discuss a very important and related concept, which is:
One of the most difficult aspects of level design I found is not the actual physical design (line drawing, obstacle placing etc.) of levels but instead the conceptual design. To make a good level, you want to keep asking yourself the question; How can I create a new and interesting experience with the mechanics that I already have?
After my first experience creating a few dozen levels which I felt were very unsatisfying, (And none of which ever made it into the game) I realized that I needed some structured process for creating levels, and stumbled on a concept that I already knew about but didn’t think applied to this game.
Emergent Game Mechanics arise not because a programmer explicitly coded them into the game rules, but from the interaction of several already existing game mechanics. Emergence is a frequent occurrence in games with a lot of procedural generation and in games where the player has a large amount of creative freedom. (Dwarf Fortress is a prime example, and an awesome game. Don’t let the interface scare you. It’s easier to play than it looks at first glance!)
Unfortunately our game iO is not based around procedural generation, nor does the player have lots creative freedom. Our game is level based and each level is handcrafted. Levels are more like a puzzle or a race, than a sandbox. This means we cannot rely on spontaneous emergence. We have to actively do work to discover the hidden potential in our game and bring it to the surface with smart level design.
The best way to do this is to get to know the implications of your game rules and their implementation as intimately as possible. It’s not enough to simply know the game mechanics and how you implemented them. You also need to think and analyze all the different ways in which they might interact. You might find that some of your rules would normally never get a chance to interact unless there is a set of very specific conditions. If you can figure out what those conditions are, then you can build your level design around it, to try and make a new interesting experience using that derived mechanic.
So how do we turn all that theory into proper levels? Well. If you are really delving deep into your game, living and breathing it daily, then your best ideas might occur in the shower or on the bus. All these problems will float through your head until, at some random moment, your subconscious presents you with a solution which you might experience as a flash of inspiration. So it is important to always keep a little notepad or booklet to write on somewhere nearby. More low-tech, the better. You can then quickly make a sketch of the idea before you forget about it and save it for later when you have time to work on it. This way you might collect a dozen sketches in a week.
The next step is to turn such a sketch of your idea into a more detailed sketch. This is where you might do the first estimates on the dimensions of various elements in a level and how elements are aligned or offset from each other, in order to make the idea work.
Then you turn the sketch into a concept level, inside the game. A concept level is a very small level which contains only the bare essentials to demonstrate the concept of this new mechanic. Nothing more, nothing less. It will serve as a proof of concept, so it is important that you are able to test the idea by playing the level inside your game or game editor.
Once you demonstrated the feasibility of the mechanic with a concrete concept level, you can then start integrating similar structures and challenges in other levels. You can even use many concept levels as introduction levels where a new mechanic is introduced without other distracting context. Or you can again combine various concepts together into new bigger levels.
Ideally, combining already existing mechanics to create new mechanics in this way should allow you to create a ton of new content without writing a single line of code or creating new assets. (other than level geometry) In reality, you may still need to do a few small tweaks here and there. Maybe to adjust some friction value, perhaps to change a mechanic’s implementation ever so slightly to allow the two to combine smoothly. Things like that.
Of course, combining existing mechanics to create new ones requires you to already have at least a few of them. If your core mechanics are not yet fleshed out, then you need to take a step back and work on that first. Otherwise you’ll be putting the cart before the horse.
From the very start (a 48 hour game jam prototype) our game contained the following mechanics:
(Both the player and all yellow rigidbody objects are simulated by the physics engine built into Unity)
Here I will show a few old screenshots of levels I created, to illustrate how elements that already exist in a game can be combined into new experiences:
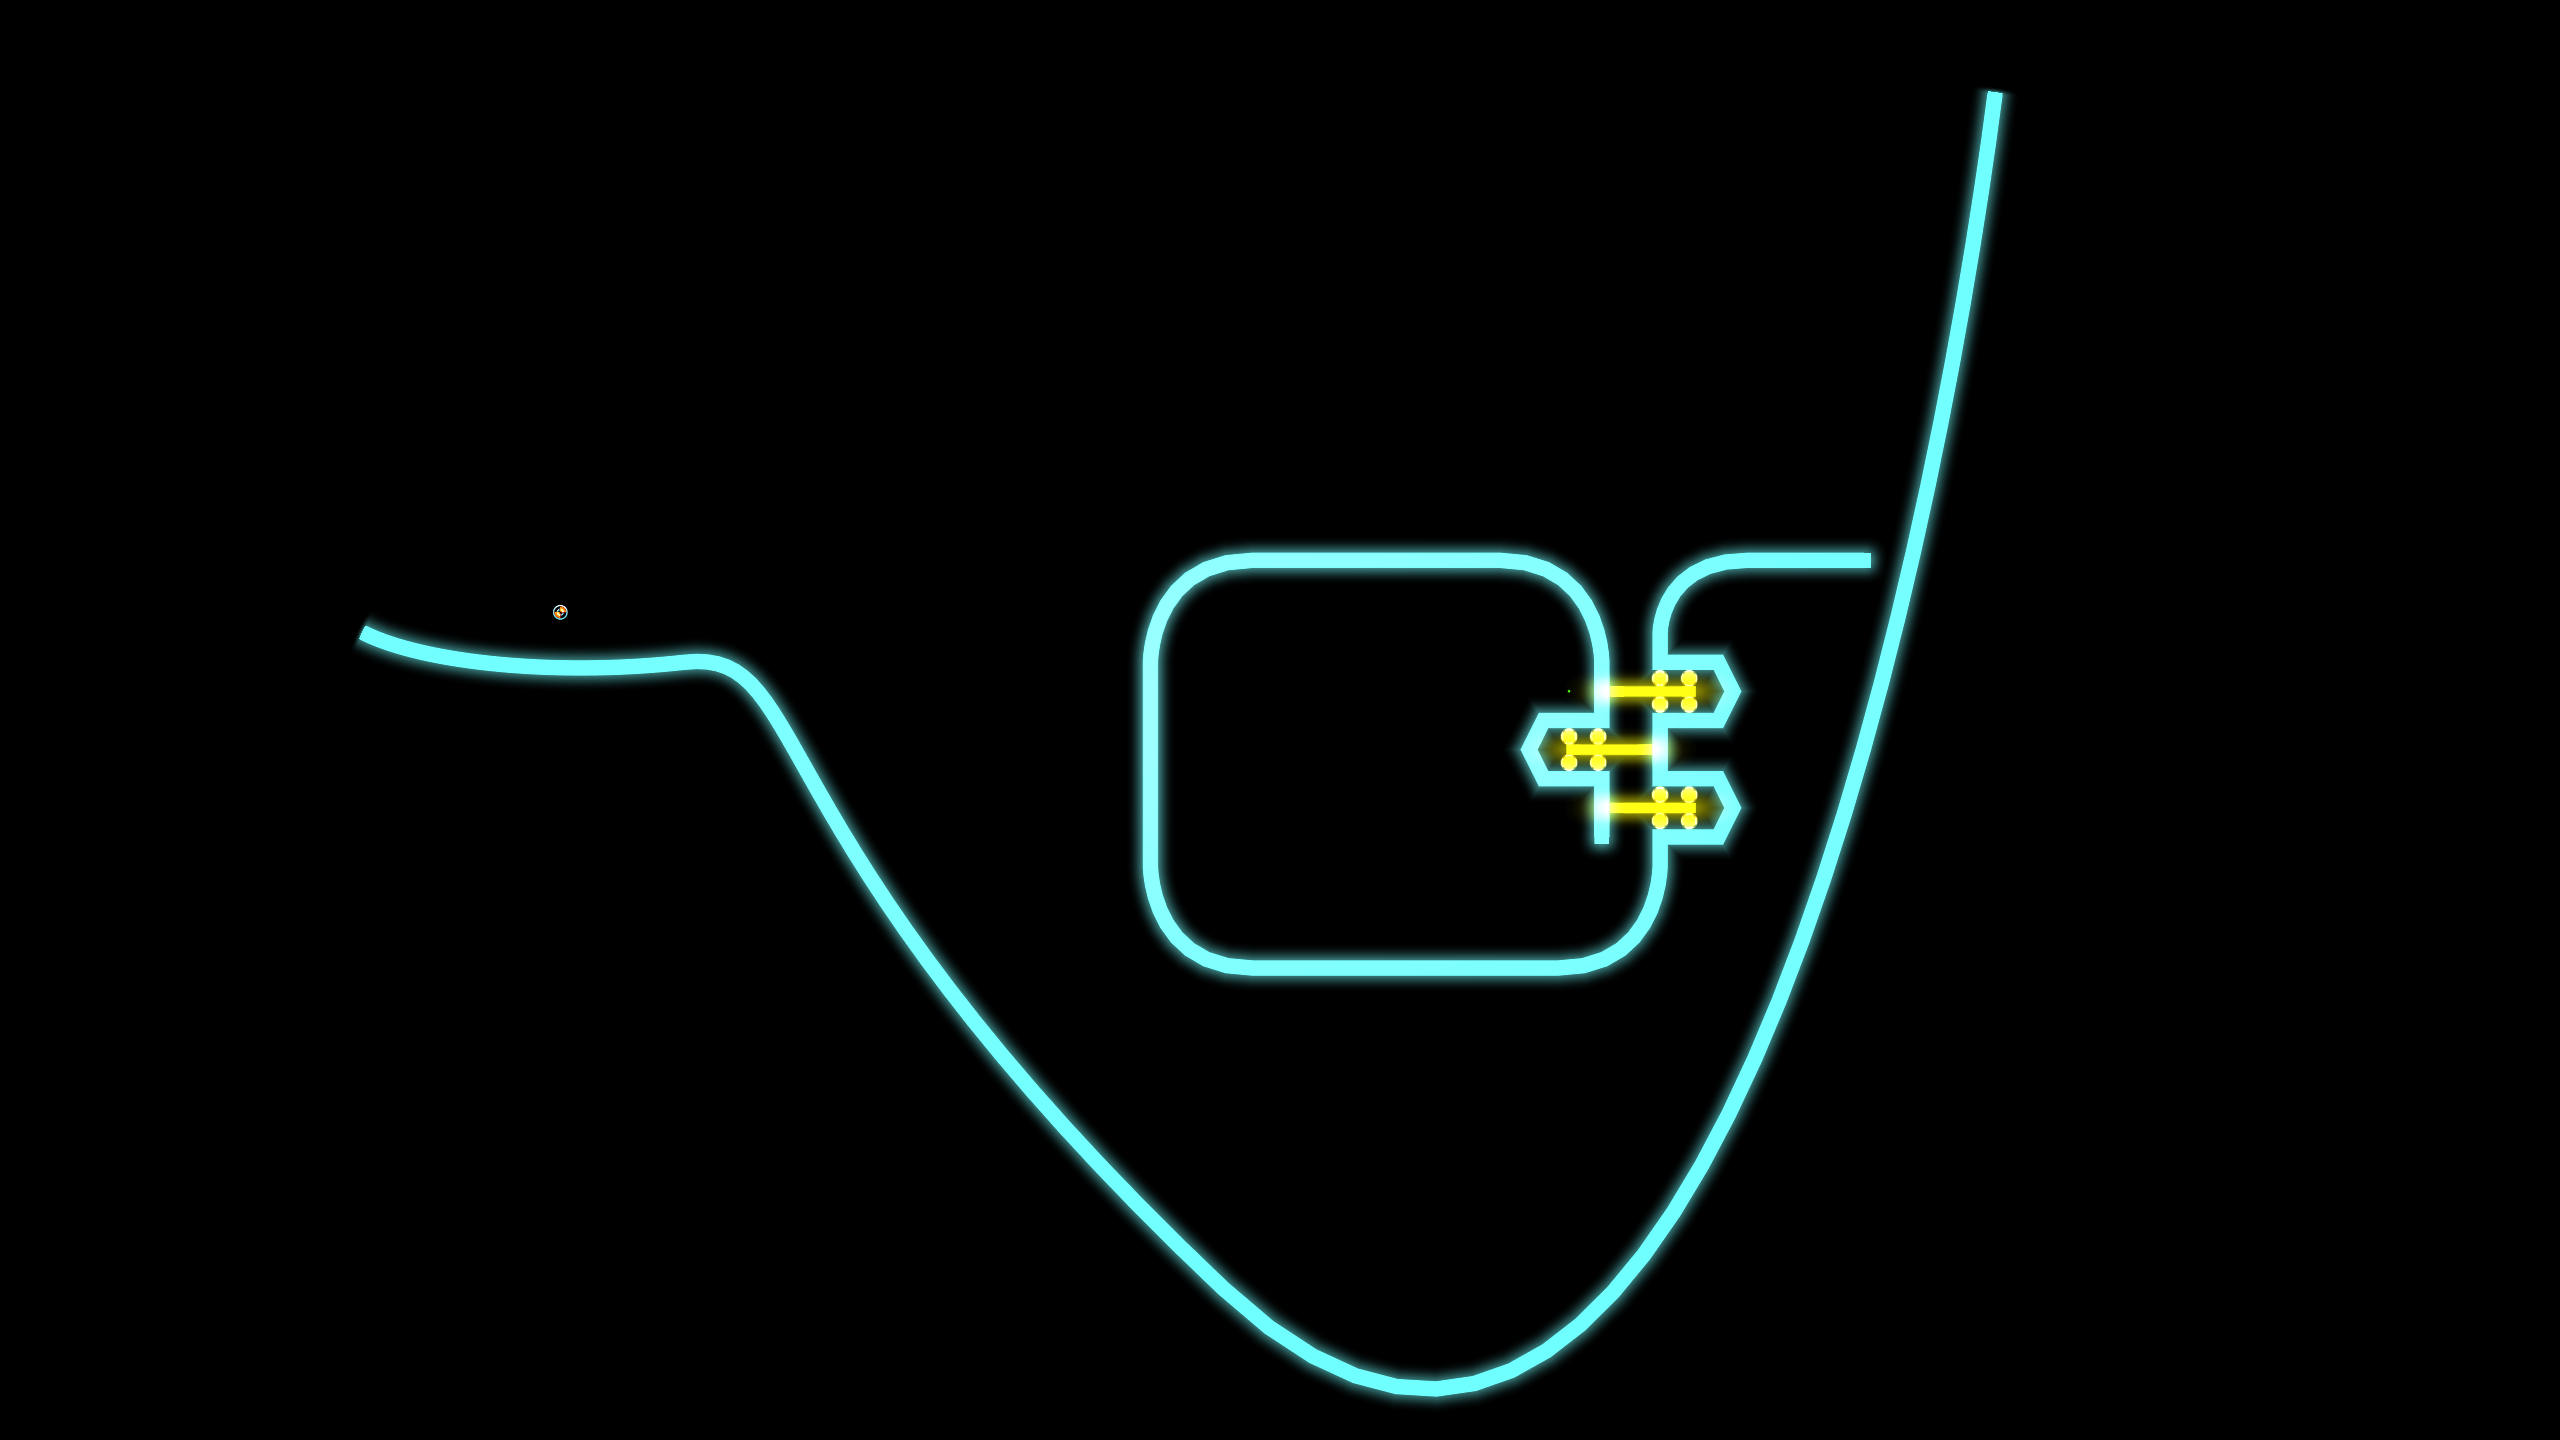 We already had a rolling player character. And we already had some yellow rigid body objects from another level with balancing bars and a pile of blocks. Rearrange them in a specific position, and add a few constraints, and you have something resembling sliding doors, which the player can open by rolling to one side, when he is on the yellow bars.
It’s not a challenging or especially interesting level. But it’s definitely an ‘Aha!’ moment for the player in the very early game.
This level is very similar in shape to an earlier level where the player learned to first shrink and then grow to get through the gap on the right before preventing himself from falling back down.
Since constraints worked well last time. Why not take it one step further, and also combine it with the red lines. We’ll construct a vehicle out of the yellow objects, and use that vehicle to traverse the red death line.
 This vehicle idea spawned an entire new type of levels. Methods to get into or out of the vehicle (which can be tricky) and levels where you have your vehicle go places where you can’t go before meeting up with it and getting back in to continue.
This level in the game is almost identical to the concept level that I used to prove to myself that this vehicle would actually work and was not just some crazy idea. The red elements are intended to force the use of the vehicle, since it is the only way to get to the bottom side safely. The only changes from the original concept level are the addition of the lip to make it easier to get into the vehicle and the bar at the end to force the player to get out of the vehicle to reach the exit.
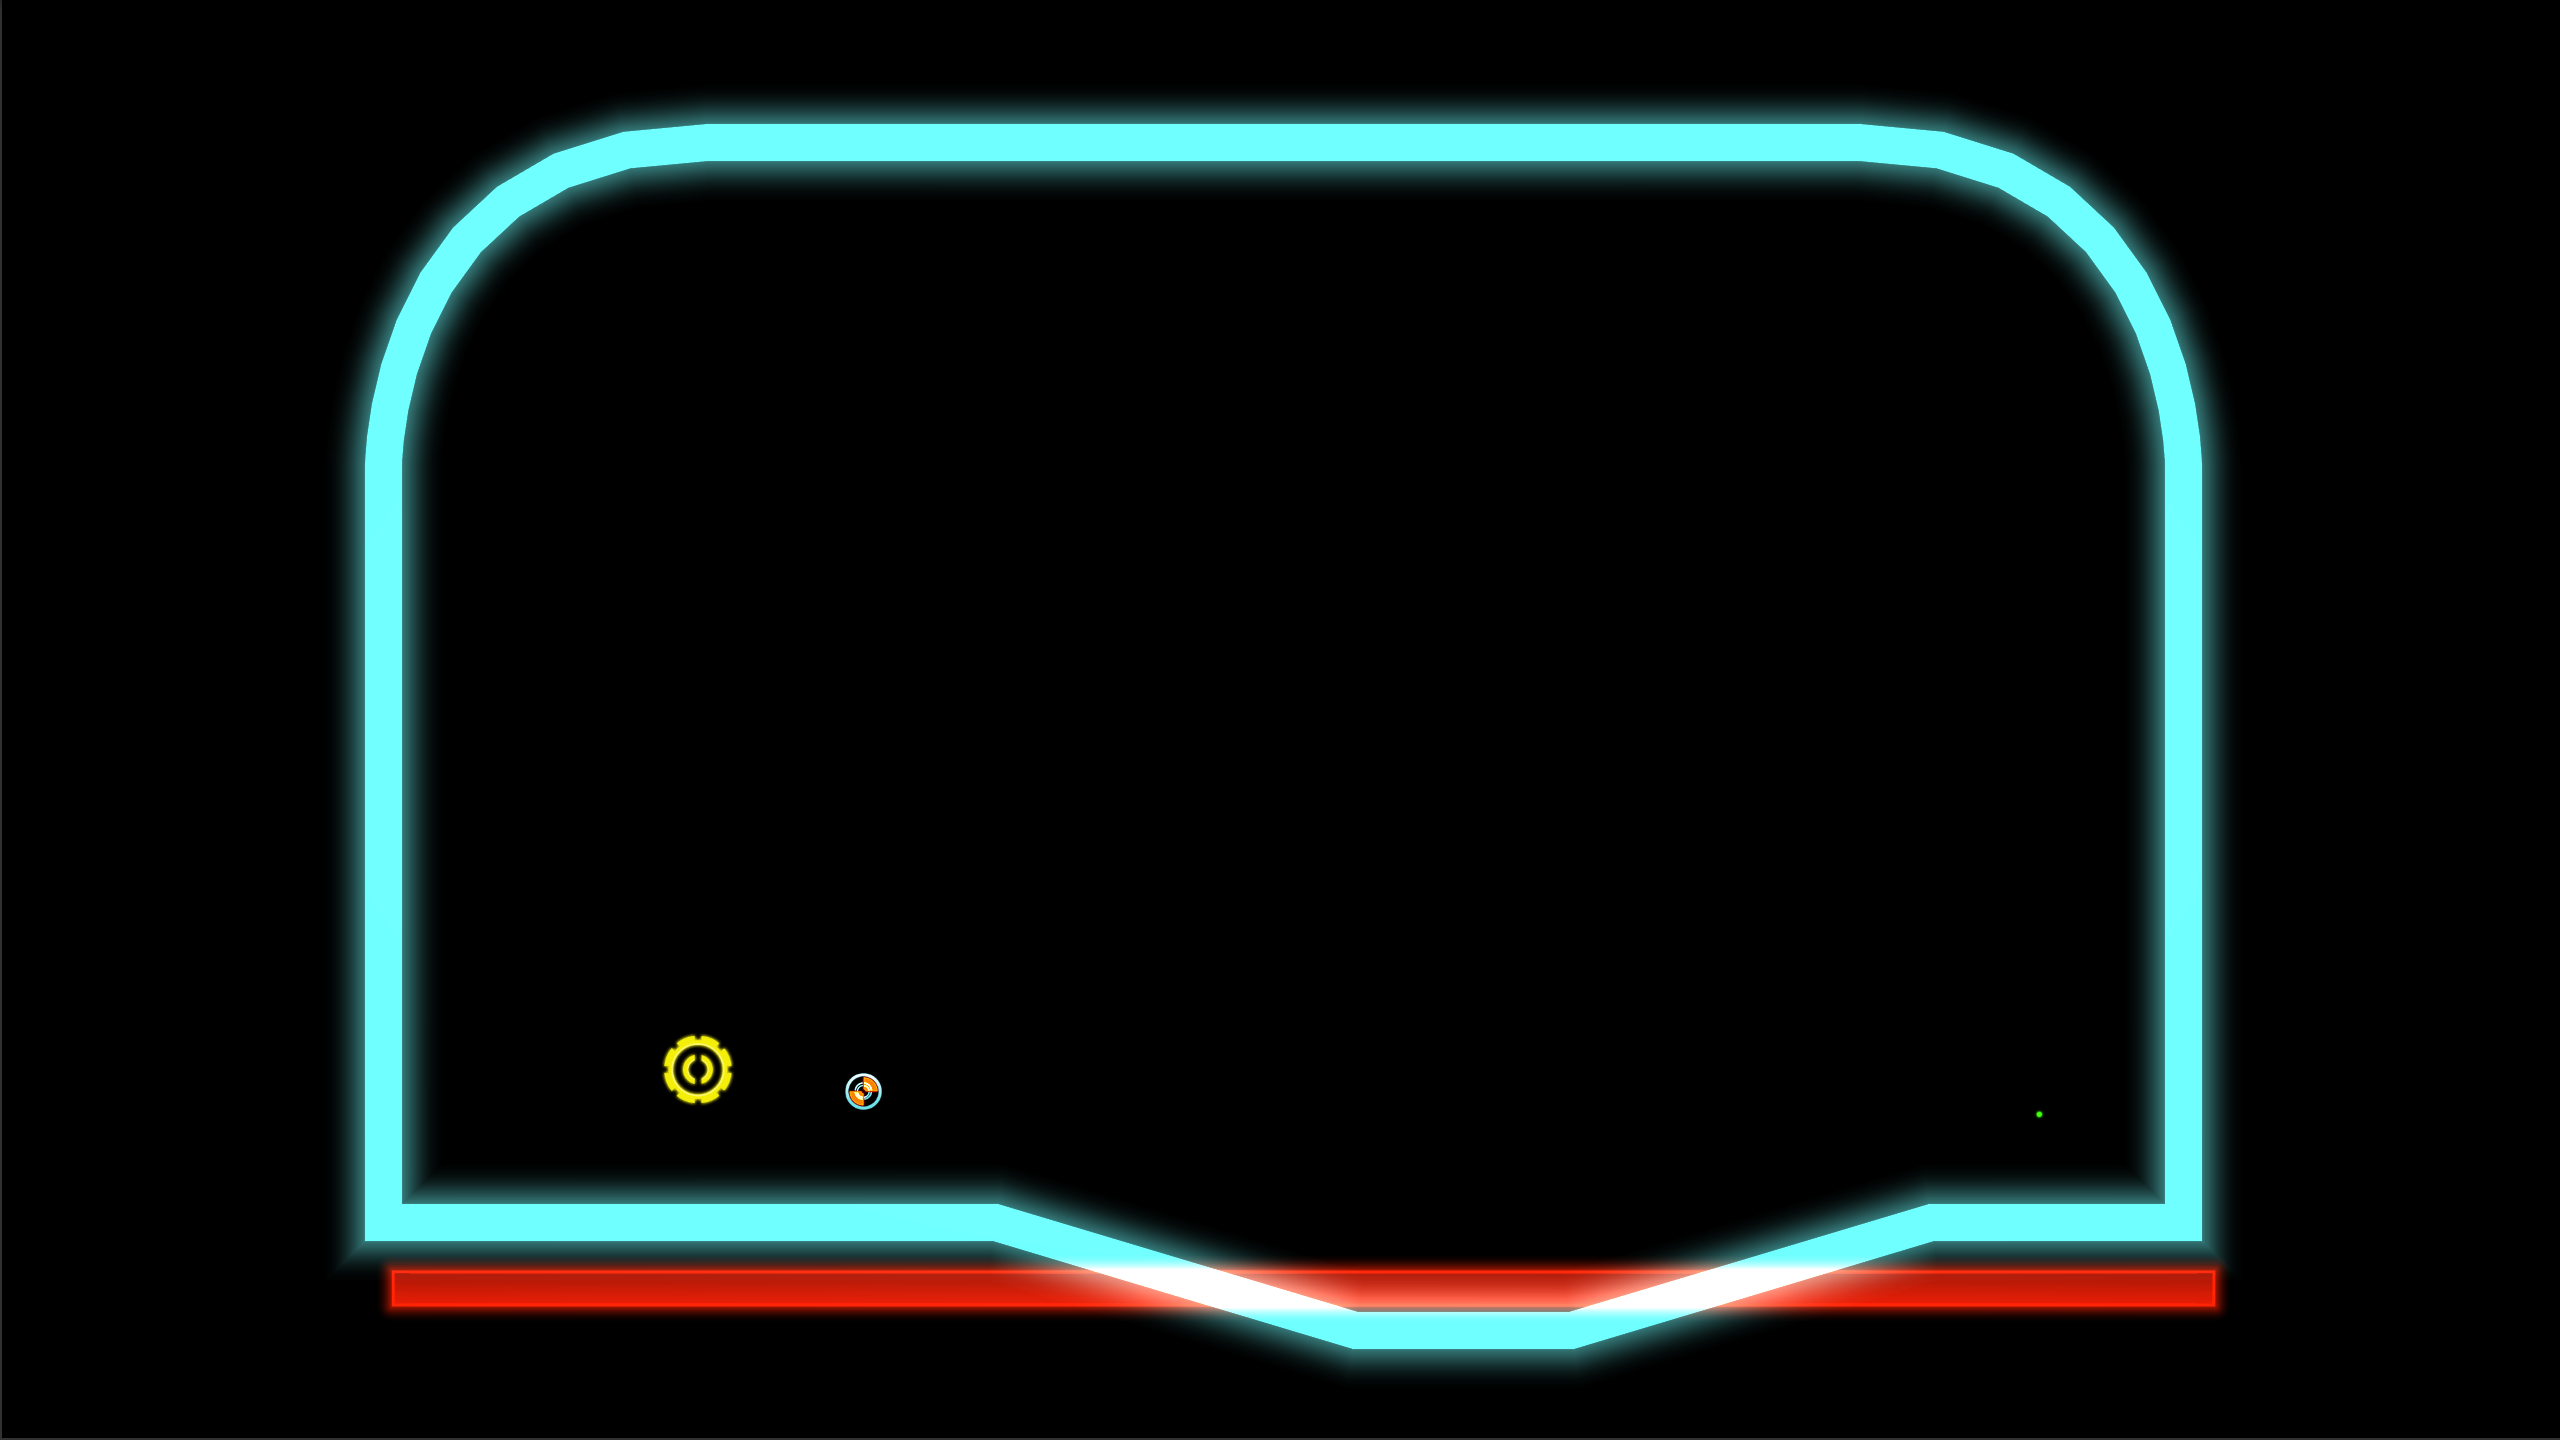
Eventually I made a simpler (but much more challenging) variant of the vehicle concept:
A designer knows he has achieved perfection not when there is nothing left to add, but when there is nothing left to take away.
Antoine de Saint-Exupery
In this example, the intent is for the player to balance on top of the wheel to drive it to the other side without touching the red bar. Operating this ‘vehicle’ is significantly more challenging, because you are constantly adjusting your balance, while the other vehicle simply requires you to sit in the middle and provide torque.
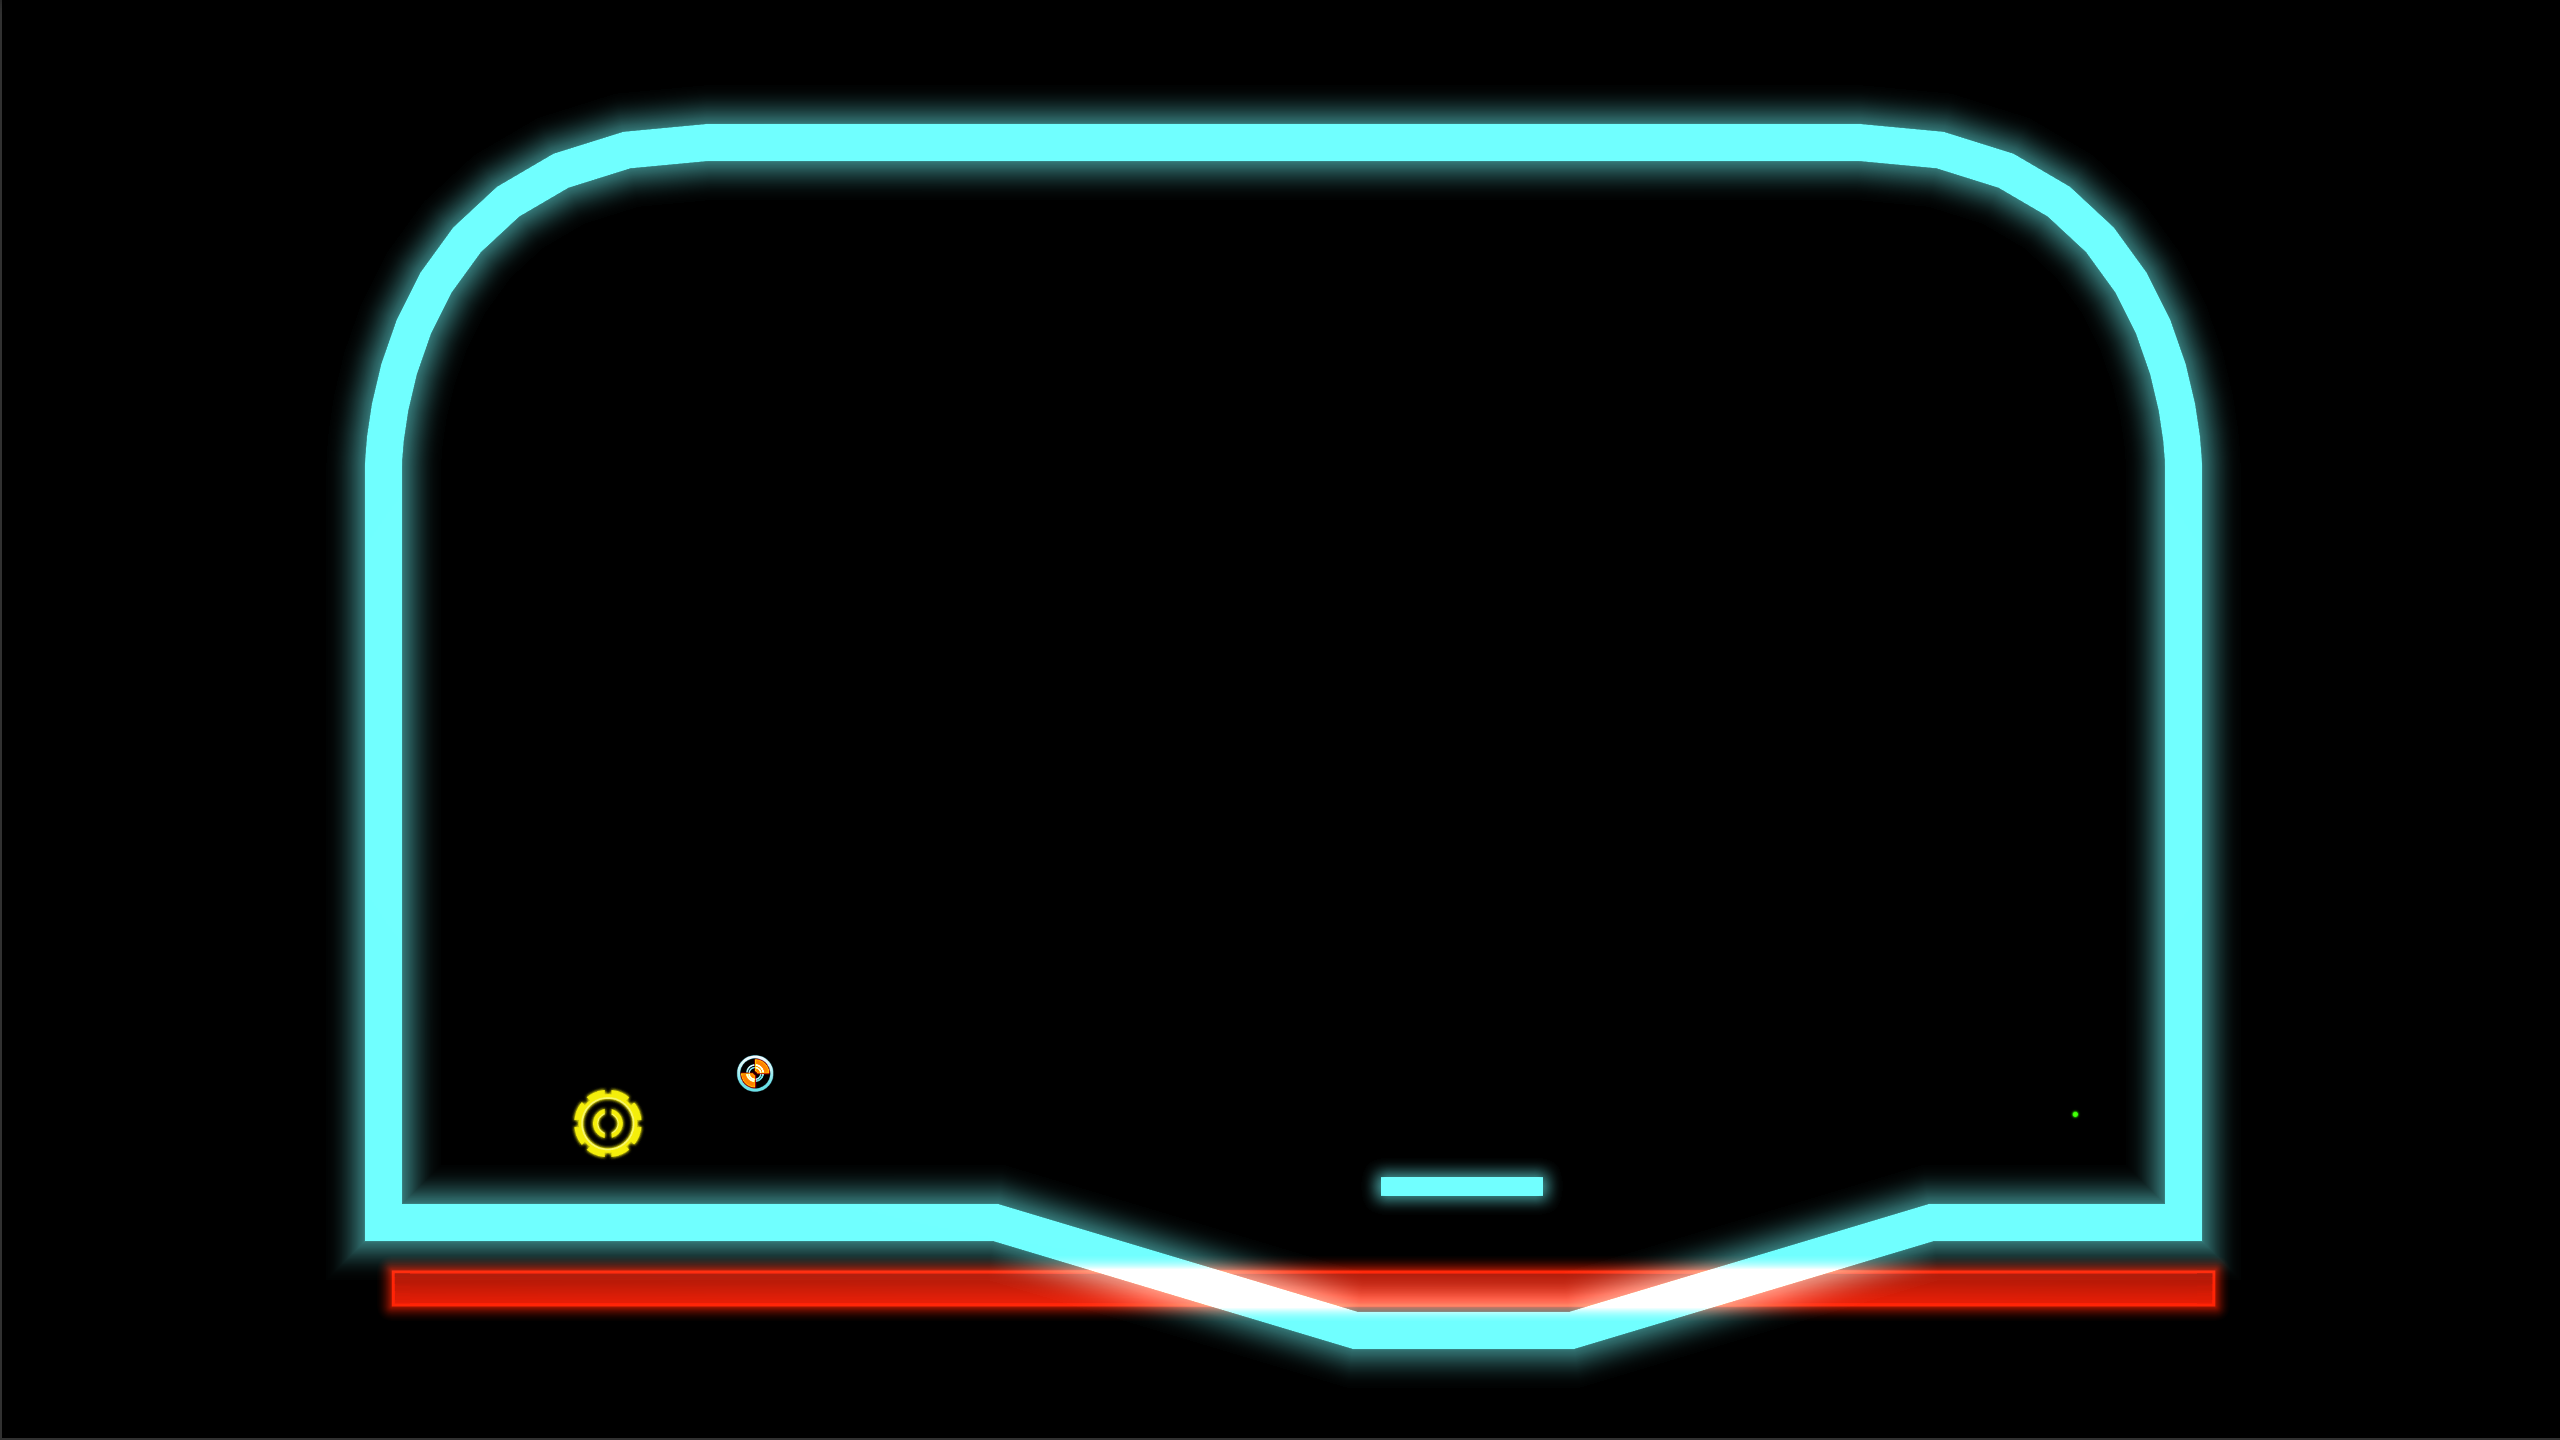
 Adding a simple bar makes instantly makes the level even more challenging, because you now need to leave the vehicle by getting on the blue bar and then getting back on when the vehicle has rolled to the right side.
Players have found another quicker way to reach the exit in this level, using a brute force trick to jump the gaps from left to right. By fast moving to the right at max size, followed by shrinking to catch the bar and then repeating the process, it is possible to reach the other side without using the vehicle. Using this trick ironically makes this level easier than the one previously mentioned, but only for skilled players.
Sidenote: Having multiple ways to solve a puzzle or overcome a challenge is usually a good thing because it makes it less likely that the player will get stuck, and players might even feel clever for thinking that they outsmarted the game or its creators.
Another example where a few simple elements can create an interesting problem. Simply a yellow rigidbody bar attached to a constraint. Note the peculiar shape of the blue lines though. The entire shape of this level was built to support a mechanic that might otherwise never get used.
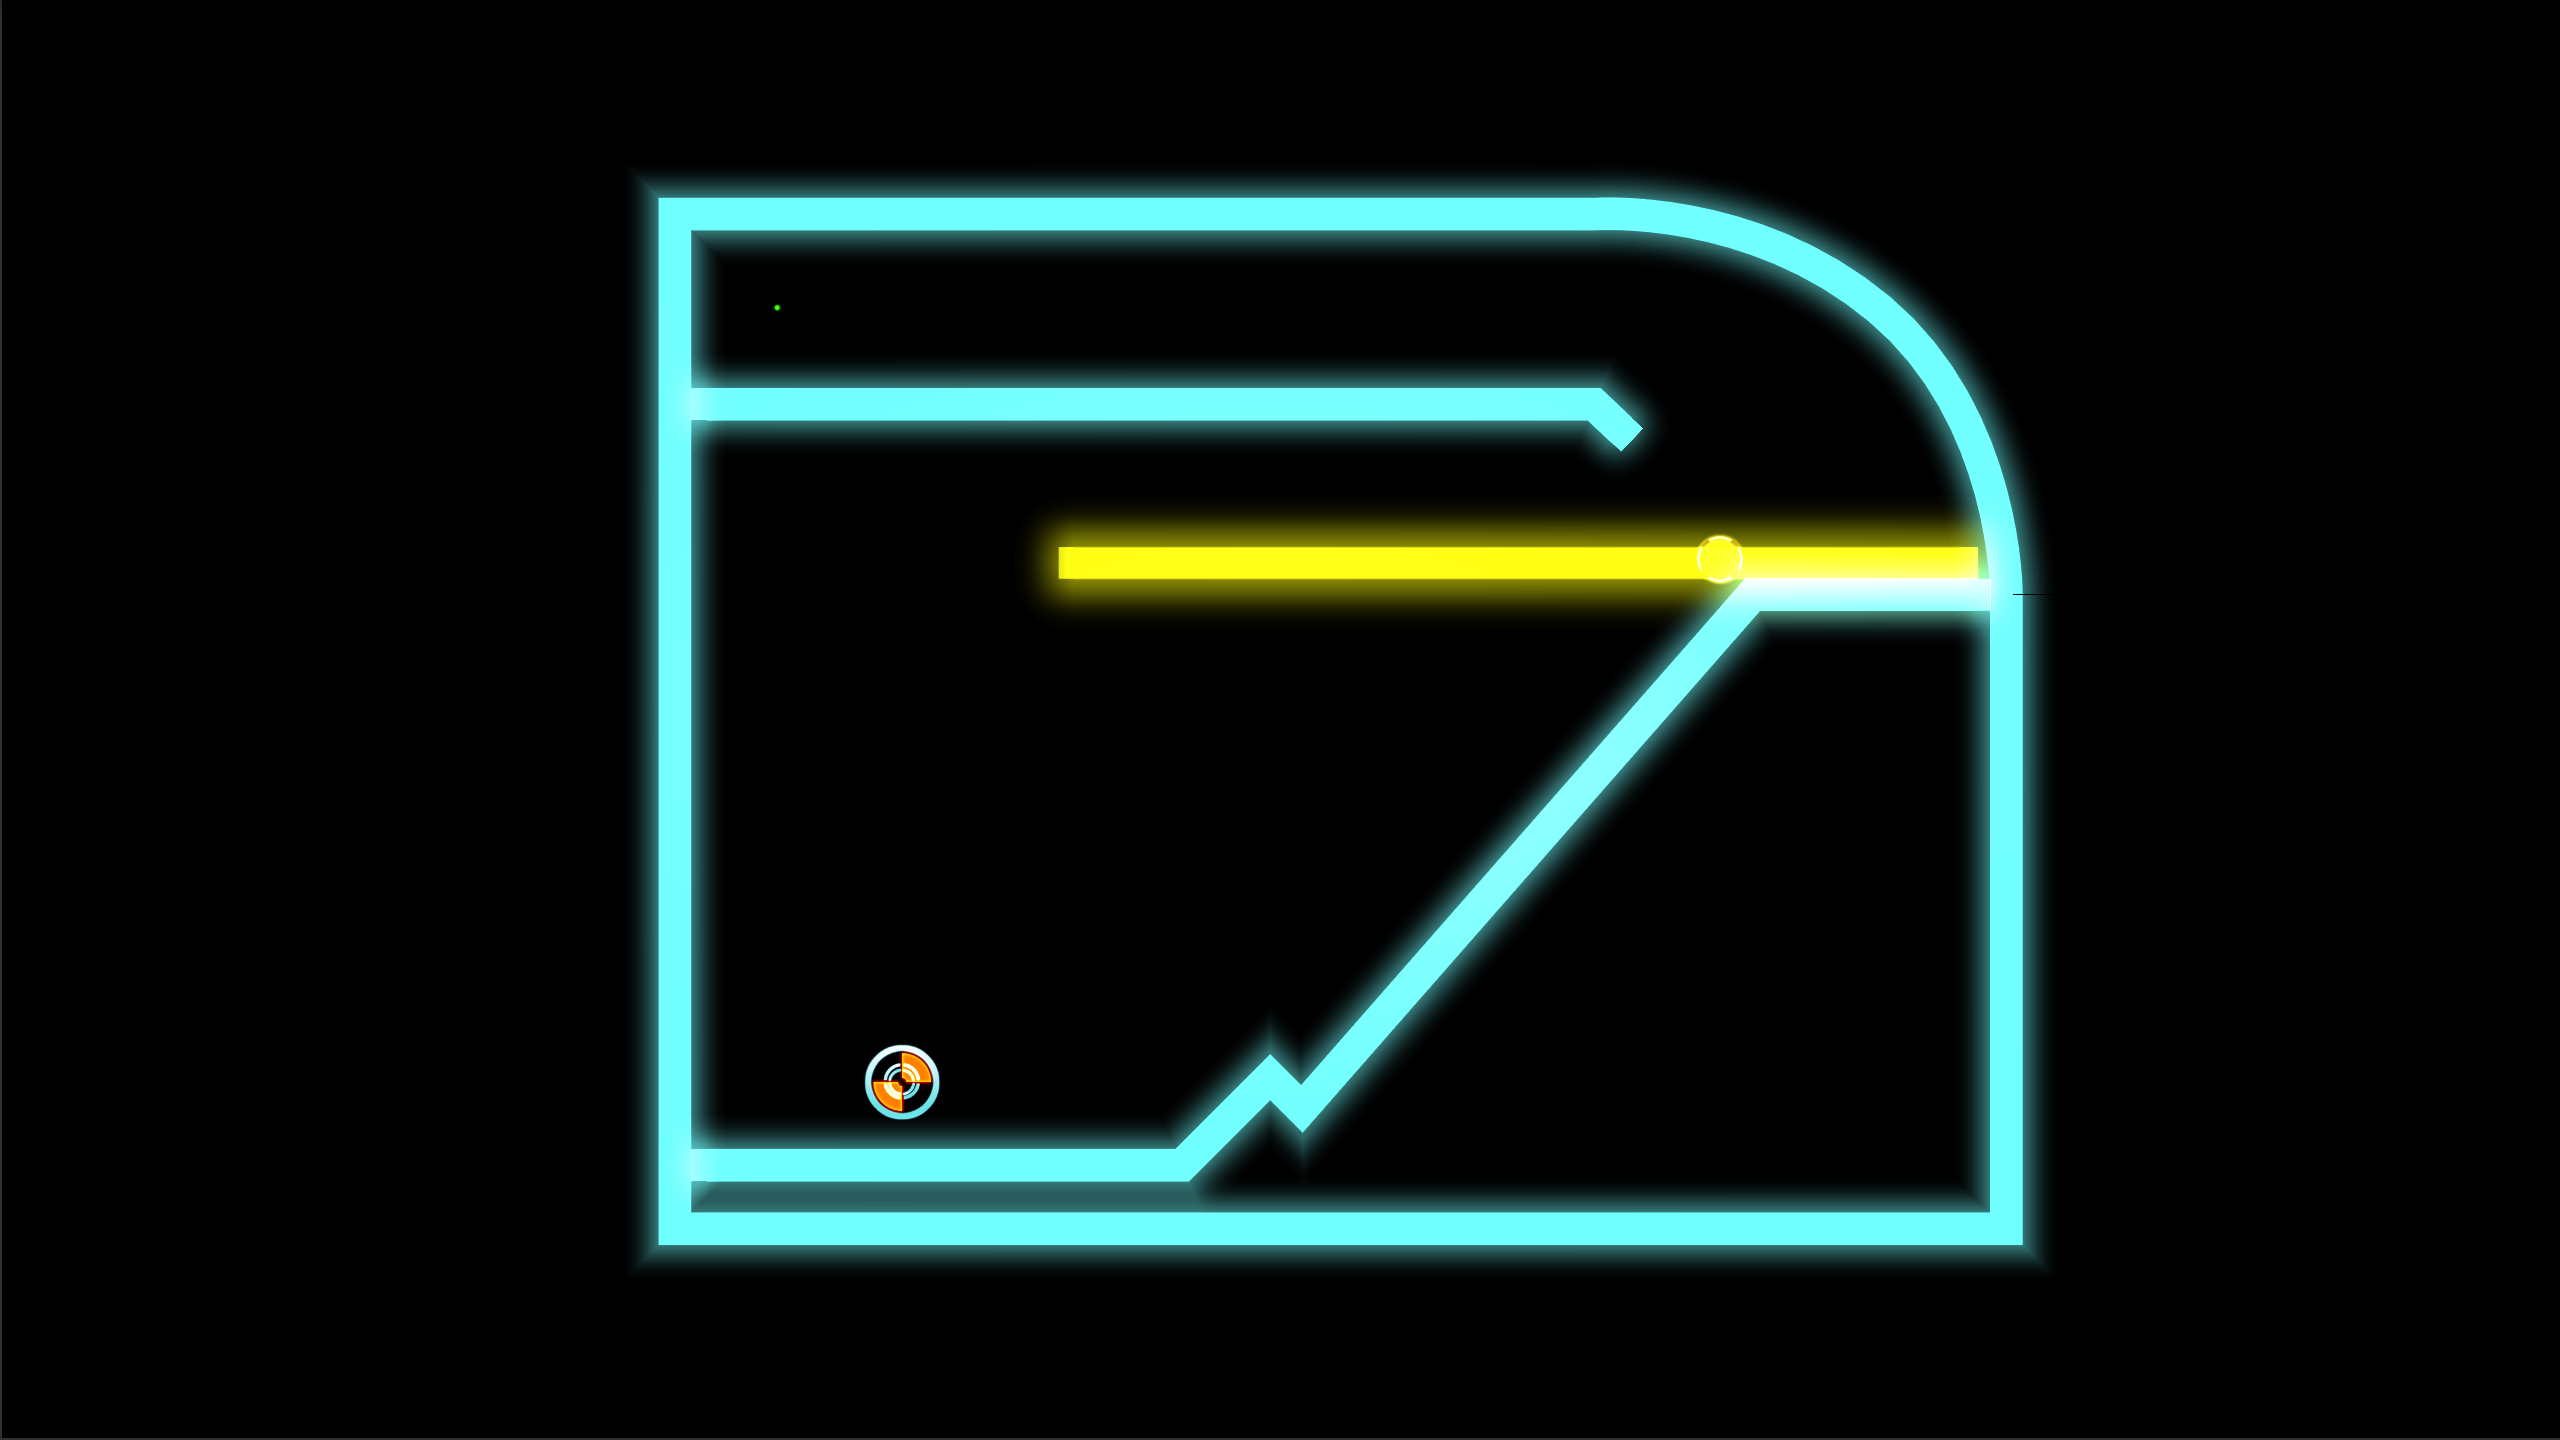
The idea here the concept of leverage. The yellow bar tilts to the left as soon as the level starts, because its own weight pulls it down. The player rolls onto the yellow bar until reaching the end, then grows in size to increase his weight, which tilts the bar back to the right. The player then shrinks to reduce his weight, causing the bar to fall back down, which causes the bar on the right side of the hinge to rise, throwing the player towards the exit in the top left.
The concept of emergent game mechanics can be a very powerful tool in level design. But it requires you to have a very good understanding of your basic game mechanics, to spot new ways to combine them in interesting ways. I find that interesting level design is in large part a constant search to discover these emergent game mechanics.
Once you have a large set of interesting levels, then you can start thinking about higher level and more abstract concepts like the difficulty curve, gating, game flow, etc.
If you liked this post, please help me out and go buy a copy of iO right now. It’s a really fun game. Tell your friends about it!
Currently I am working at a company on a project where it is very important that the player is able to easily inspect and interact with certain objects from various angles by focusing on, zoom and rotating around them. This also required constraints to limit the camera to predefined areas, to guide the player and to prevent clipping. Nothing I could find really satisfied me, so I wrote my own variant.
Orbital camera systems by themselves are quite simple to implement, but things can get a bit tricky when you start to add constraints as a requirement. I noticed many people having problems with this sort of thing, so I finally took the time to explain the way I decided to approach this problem. It’s also to help me remember this stuff if I need something similar at a later date. Included is a simplified piece of example code.
Let’s start with defining our focus points and constraints. When people think about rotations, many of them think in degrees or radians. That’s why it might seem natural to define the constraints simply as a set of angles like MinPitch, MaxPitch, etc.
There is a different way to do it, which may seem a bit of a weird approach at first, but it makes the entire constraint problem much easier to solve. Instead of setting explicit boundary numbers on each side, we define the constraint as a maximum deviation from a center rotation. The constraint is then defined by the angles YawLimit, PitchLimit and the center rotation. (the center rotation in this case being simply the rotation of the focus point object)
Doing it this way means we can avoid the mess of trying to figure out where we are in relation to the constraints and whether we need to rotate left or right to satisfy them. We can simply calculate the difference between the angles and then use linear interpolation to move the required amount back towards the target rotation without needing to know or care which direction that is. We also don’t have to deal with issues such as wrapping around from weird angles like at the 0-360 degrees boundary.
For that reason, instead of storing most of our angles as floats, we store them as Quaternions. Quaternions seem complicated, but they really make some calculations much easier. And if we want to work in degree angles, we simply convert between them.
Finally, we multiply our current pitch and yaw rotations together to get our desired rotation. We could stop at this point, and then we would simply have a camera that rotates on the spot. Useful for e.g. a security camera. To turn it into an orbit camera, we calculate our offset by taking our forward vector and multiplying it with our target rotation, then adding that to the position of our target object. Lastly, we can add some damping for smoother movement.
Note that this implementation may not be suitable for everyone, as it largely depends on your use case, but if not then at least it may give you some ideas on how to write your own, suited for your purposes. The example code is also very basic and not optimized so you may want to add a few improvements if you decide to use it.
| using UnityEngine; | |
| using System.Collections; | |
| /// <summary> | |
| /// Defines angle limits as the maximum deviation away from the rotation of this object. | |
| /// (in other words: if the yawlimit is 45, then you can only move up to 45 degrees away from this rotation in both directions. | |
| /// This means the total angle available would be an angle of 90 degrees) | |
| /// An angle of 180 allows complete freedom of movement on that axis. | |
| /// </summary> | |
| public class FocusPoint : MonoBehaviour | |
| { | |
| [SerializeField] | |
| private float _yawLimit = 45f; | |
| [SerializeField] | |
| private float _pitchLimit = 45; | |
| public float YawLimit { get { return _yawLimit; } } | |
| public float PitchLimit { get { return _pitchLimit; } } | |
| } | |
| /// <summary> | |
| /// A basic orbital camera. | |
| /// </summary> | |
| public class OrbitCamera : MonoBehaviour | |
| { | |
| // This is the target we'll orbit around | |
| [SerializeField] | |
| private FocusPoint _target; | |
| // Our desired distance from the target object. | |
| [SerializeField] | |
| private float _distance = 5; | |
| [SerializeField] | |
| private float _damping = 2; | |
| // These will store our currently desired angles | |
| private Quaternion _pitch; | |
| private Quaternion _yaw; | |
| // this is where we want to go. | |
| private Quaternion _targetRotation; | |
| private Vector3 _targetPosition; | |
| public FocusPoint Target | |
| { | |
| get { return _target; } | |
| set { _target = value; } | |
| } | |
| public float Yaw | |
| { | |
| get { return _yaw.eulerAngles.y; } | |
| private set { _yaw = Quaternion.Euler(0, value, 0); } | |
| } | |
| public float Pitch | |
| { | |
| get { return _pitch.eulerAngles.x; } | |
| private set { _pitch = Quaternion.Euler(value, 0, 0); } | |
| } | |
| public void Move(float yawDelta, float pitchDelta) | |
| { | |
| _yaw = _yaw * Quaternion.Euler(0, yawDelta, 0); | |
| _pitch = _pitch * Quaternion.Euler(pitchDelta, 0, 0); | |
| ApplyConstraints(); | |
| } | |
| private void ApplyConstraints() | |
| { | |
| Quaternion targetYaw = Quaternion.Euler(0, _target.transform.rotation.eulerAngles.y, 0); | |
| Quaternion targetPitch = Quaternion.Euler(_target.transform.rotation.eulerAngles.x, 0, 0); | |
| float yawDifference = Quaternion.Angle(_yaw, targetYaw); | |
| float pitchDifference = Quaternion.Angle(_pitch, targetPitch); | |
| float yawOverflow = yawDifference – _target.YawLimit; | |
| float pitchOverflow = pitchDifference – _target.PitchLimit; | |
| // We'll simply use lerp to move a bit towards the focus target's orientation. Just enough to get back within the constraints. | |
| // This way we don't need to worry about wether we need to move left or right, up or down. | |
| if (yawOverflow > 0) { _yaw = Quaternion.Slerp(_yaw, targetYaw, yawOverflow / yawDifference); } | |
| if (pitchOverflow > 0) { _pitch = Quaternion.Slerp(_pitch, targetPitch, pitchOverflow / pitchDifference); } | |
| } | |
| void Awake() | |
| { | |
| // initialise our pitch and yaw settings to our current orientation. | |
| _pitch = Quaternion.Euler(this.transform.rotation.eulerAngles.x, 0, 0); | |
| _yaw = Quaternion.Euler(0, this.transform.rotation.eulerAngles.y, 0); | |
| } | |
| void Update() | |
| { | |
| // calculate target positions | |
| _targetRotation = _yaw * _pitch; | |
| _targetPosition = _target.transform.position + _targetRotation * (-Vector3.forward * _distance); | |
| // apply movement damping | |
| // (Yeah I know this is not a mathematically correct use of Lerp. We'll never reach destination. Sue me!) | |
| // (It doesn't matter because we are damping. We Do Not Need to arrive at our exact destination, we just want to move smoothly and get really, really close to it.) | |
| this.transform.rotation = Quaternion.Lerp(this.transform.rotation, _targetRotation, Mathf.Clamp01(Time.smoothDeltaTime * _damping)); | |
| // offset the camera at distance from the target position. | |
| Vector3 offset = this.transform.rotation * (-Vector3.forward * _distance); | |
| this.transform.position = _target.transform.position + offset; | |
| // alternatively, if we desire a slightly different behaviour, we could also add damping to the target position. But this can lead to awkward behaviour if the user rotates quickly or the damping is low. | |
| //this.transform.position = Vector3.Lerp(this.transform.position, _targetPosition, Mathf.Clamp01(Time.smoothDeltaTime * _damping)); | |
| } | |
| } | |
| public class CameraMouseInput : MonoBehaviour | |
| { | |
| [SerializeField] | |
| private OrbitCamera _cam; | |
| private Vector3 _prevMousePos; | |
| void Update() | |
| { | |
| const int LeftButton = 0; | |
| if (Input.GetMouseButton(LeftButton)) | |
| { | |
| // mouse movement in pixels this frame | |
| Vector3 mouseDelta = Input.mousePosition – _prevMousePos; | |
| // adjust to screen size | |
| Vector3 moveDelta = mouseDelta * (360f / Screen.height); | |
| _cam.Move(moveDelta.x, -moveDelta.y); | |
| } | |
| _prevMousePos = Input.mousePosition; | |
| } | |
| } |
There’s many ways this example can be improved upon. The following suggestions are left as an exercise for the reader:
Yes. I’m stil alive. I am guilty as charged for not updating this blog since forever.
With that out of the way, let’s focus on some good news! Size Matters Expandaball iO is finally released, after two name changes and way too much time in development! I also wrote a page summarizing the whole development process.
Get it now! On the following platforms:
iOS
Ouya (Oh, who am I kiddng. Nobody actually uses Ouya)
Buy the game or try the demo!
Don’t forget to leave a review! It helps out a lot!
I already have a new game project in the works.
I should really revive this blog and update more regularly. Maybe write something about the Level Design process for iO?
Me and my team are almost done with the polishing on our game, which we have decided to name Expandaball. It’s been a long road since the first prototype from the 2012 global game jam Size Matters, but now a commercial release is finally upon us. We intend to show a demo on the Festival of Games so come visit us if you want.
But that is not what this post is about. Lately we have done a lot of testing on mobile devices to perfect the experience and especially the touch control system. Mostly I’ve been testing on my android Nexus 7 which I purchased specifically for this purpose. I just never before saw the need for a tablet device when I already have a perfectly good PC and notebook.
So I thought, maybe I should put this tablet to use and do some scouting. Try out some mobile games and try to see what’s the hype with these devices. So I downloaded some free games from the play store, and noticed they are mostly crappy micro transaction based games with very simple game gameplay. Then a bit later I took a look at regular games with a purchase price. Unfortunately the Play market only accepts credit card, which I will not get, due to not having a fixed income. (Fix that Google!) Luckily there was the Humble Android Bundle to the rescue with a collection of great games for my device. Among them was Metal slug and Raiden Legacy.
I still have some fun memories playing Metal Slug on an arcade while on vacation somewhere at a young age. And Raiden also seemed to be loads of fun for my tastes. In each of these I quickly went down in a blaze of glory. A significant reason for this was simply my lack of experience with these types of games. (My exposure to arcades was quite limited while growing up) The more important reason was the frustrating controls.
I was simply unable to control my character fine and fast enough to avoid all the glorious firepower. Every once in a while my fingers would slide off the virtual d-pad without me noticing, or the smudged touch screen would fail to register I just moved my finger a few millimeters to the side to avoid that yellow dot.
The games are not at fault. These games were originally designed to be played with physical buttons and worked great. The transition to a touch screen just didn’t work very well. If this was a console or a PC I would just have plugged in a game pad and all would be well. As a gamer I have always before taken the physical feedback offered by the gamepad or joystick or keyboard for granted. Just goes to show we usually don’t know what’s valuable until it’s missing.
Expandaball also requires a lot of fine control. Luckily our game is quite slow paced so touch controls are still doable with , but the fact remains that keyboard and game pad just offer better control and thus a better experience to the player so we’ll definitely try to release on different platforms.
I don’t see touch devices ever becoming serious contenders for complex or twitch gaming, which makes me sad because I imagine there might be a lot of indie devs who want to make these types of games, but unable to get their game on a real gaming console or handheld due to the closed nature of these ecosystems. Maybe the Ouya will change that. Otherwise there’s always the PC platform so maybe things aren’t all bad. Unfortunately, this could mean that there will always be a divide between mobile gaming and the core gaming markets.
A while ago I took the task of improving the ‘stuck detection’ code in our game codenamed Size Matters, and I want to share this solution in case someone out there finds it useful.
This game features a player character which is essentially a circle with the ability to roll in both directions and traverse a level. What makes our game relatively unique is that it also has the ability to grow and shrink. This allows various interesting twists to what would otherwise be a fairly standard platformer type game.
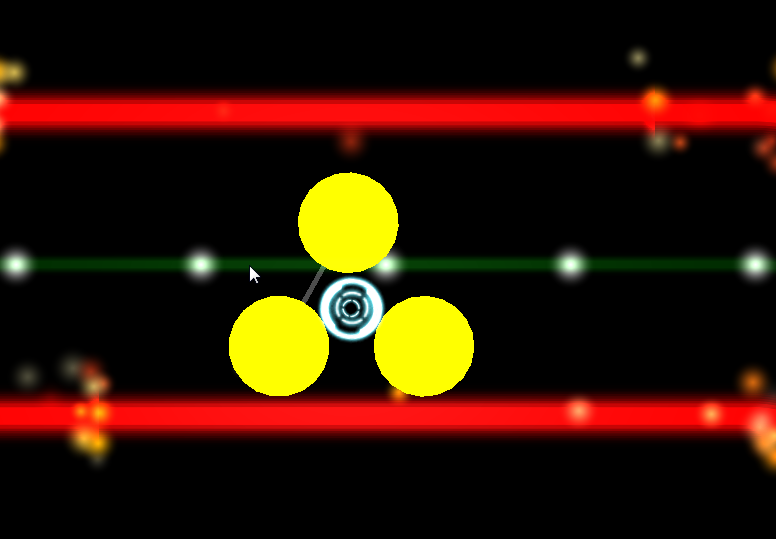
The player can enter this vehicle by shrinking into the gaps and growing to fill the space in the middle. The player can provide torque to turn the wheels.
This introduces the issue of knowing when the player is allowed to grow. Obviously if the player is encased on all sides by walls or other colliders, then he should not be able to grow as that would cause spazzing and might even break the level design. If the player is only partially encased, then he may be able to grow, and pop out of a hole if needed. So we needed a way to determine when the player is considered stuck.
Our first approach was conceived during the game jam where the first prototype of this game was built. It was a hasty, naive approach which took contact-points from current collisions and compared the directions using the dot product. If the value exceeded a certain threshold, we considered them opposite and the player was considered stuck. This worked for the most obvious cases such as pipes, though there were still quite a few situations where it failed. It would not work with the vehicle in the image above.
For production I wanted something that actually worked reliably. I took a step back and reflected on the situation. What information do we have:
Play around with this on a scratchpad or in a program like Cinderella and you’ll come to the following conclusion:

The next question then becomes, how do we figure out if the midpoint lies within the triangle? The answer lies in high-school geometry.
- If and only if a triangle is acute (all angles smaller than a right angle), the circumcenter lies inside the triangle.
- If and only if it is obtuse (has one angle bigger than a right angle), the circumcenter lies outside the triangle.
So we only need to check if one of the angles of the triangle is larger than a right angle. The easiest way to do that is to take the dot product of the directions of the two line segments. If the dot product is negative, that means the angle is greater than 90 degrees.
But wait.. How do we deal with more than three contact-points? We simply take the first contact points, and iterate over the rest in pairs. If any resulting triangle overlaps the midpoint, then the player is stuck.
As I am writing this, me and my team are almost done developing and polishing our game Size Matters from the GGJ 2012 for commercial release. The only things left to do are some art and gui work, and organizing and perfecting our collection of levels.
I’ve solved quite a few problems during the making of this game, and today I will be writing about one of them. First some background story.
The first prototype of the game was made during the Global Game Jam 2012 in Hilversum. We had a small team and thus we decided to rely heavily on Unity’s strengths namely built-in physics and ease-of-use. (In an ad-hoc team not everyone will be familiar with any chosen game engine) So we quickly made a fun game just by scaling and duplicating the standard cube, and using that in our levels. Anyone who’s seen the original trailer or played the game will realize it looks pretty blocky. This was the result of building everything out of cubes and together with our chosen art style, we did not need any artists.
After the jam was over and realizing we were going to develop this thing for real, I took the time to create a proper editor for level building to allow for smoother lines and an easier workflow than messing about with tons of cubes. Essentially, we wanted some kind of vector drawing editor in Unity. Goals of this system:
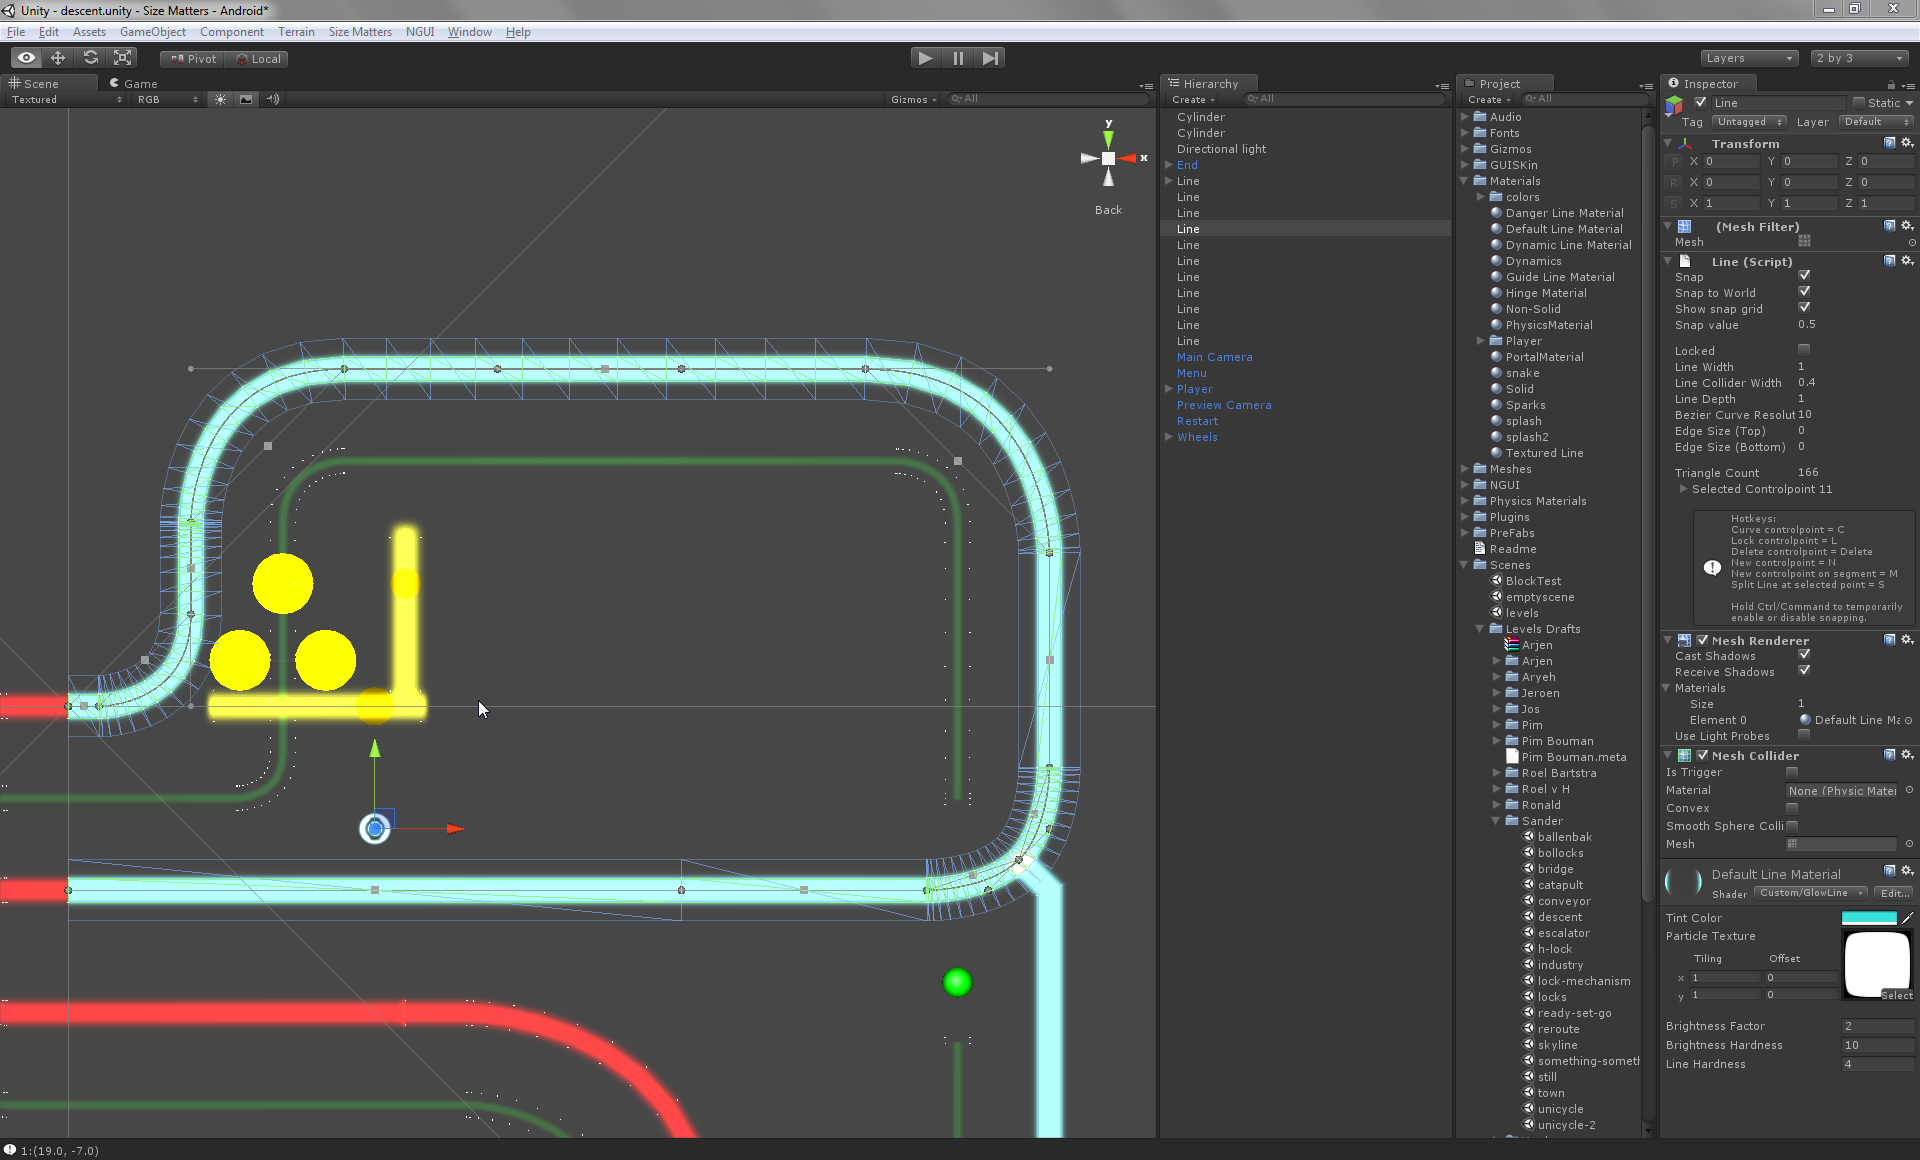
The first step is determining what data you need and how you want to organize it. For our purposes, it was logical to create a Line class inheriting from MonoBehaviour to stick on a gameObject. This meant we could make prefabs of lines or edit them directly in a scene.
This Line component then contains a list of serializable control points, which determine where it goes and how it curves. A ControlPoint has the following properties:
A ControlPoint also has the Handle1 and Handle2 properties, which are useful shortcuts to allow editing of the tangents in an intuitive way. While a tangent represents a direction and magnitude, a handle represents the position of the control point added to the tangent.
The boolean property Curved is not strictly necessary as it is also possible to set both tangents to zero and achieve a similar result, but it helps to simplify certain calculations in a later stage when the meshes are created.
There are many other ways to do curves, such as Catmull-rom and NURBS. We chose to use Bezier curves here because of the balance between complexity and flexibility. It’s also familiar to anyone who has used vector drawing programs such as Inkscape or Illustrator.
We’ll also store some extra settings in the Line to define visual line width, collider width, and curve resolution.
The second step is creating an editor to make this data accessible without having to dive into an obscure list to change numerical values at random. Here we see another strength of Unity in it’s extendability. We can simply replace the default Line inspector with our own by creating a new class, inheriting from Editor and adding the CustomInspector attribute.
We can implement OnInspectorGUI to change the contents of the inspector itself, and we can implement OnSceneGUI to draw all our lines and edit handles in the scene view using the Handles class.
Every editor event, the OnSceneGUI method will iterate over all control points in the line and draw lines connecting them. For every control point, it will also draw handles for position and tangents so the level designer can simply drag them around the scene.
This is probably also the time where you start wondering about how to draw curves. Conveniently there is already a Handles.DrawBezier method available for us courtesy of Unity. But in the next stage, we will have to familiarize ourselves with the bezier function.
Of course sometimes special operations are needed so having functionality to select control points is also a good idea. This, for example, allows the user select a point and delete it, or select an endpoint and create new points from there onwards. These special operations can be triggered from the inspector, or in response to a shortcut, or both.
Another feature that turned out to be very useful is snapping. Unity editor handles give you raw data, so if you want any sort of snapping, you’ll have to do it yourself in the editor script.
Now that we have our data representation of lines and the ability to edit them, it is time to make them actually useful by generating meshes from them. Again we’ll divide this process up into several steps.
The first step is to take our collection of control points which define our line and convert it into something sensible to work with. We iterate over all control points and use them to create a list of straight line segments. For the normal control points this is simply copying their position. For the curved control points, we need to create some intermediate points to follow the curve’s shape at a predefined resolution. We iterate over these points while increasing a progress variable t from 0 to 1. We feed this to our cubic bezier function to get the required position at each point on the curve.
public static Vector3 Bezier3(Vector3 s, Vector3 st, Vector3 et, Vector3 e, float t) {

return (((-s + 3 * (st - et) + e) * t + (3 * (s + et) - 6 * st)) * t + 3 * (st - s)) * t + s;

}
Once we have this segmented line, the next step is to convert it into a Mesh. We can iterate over all the points and construct the mesh in parallel. Every line segment will correspond to two triangles, the size of which is dependent on the width of the line. Another approach is to simply create an outline and feed that to a polygon triangulation library.
Do this two times and you will have a render mesh and a collision mesh, both with different sizes. It is advisable to modify the collision mesh into something with depth, as Unity physics does not really like flat meshes.
And that’s how you make a 2D vector line editor in a 3d engine like Unity. Hopefully, some of you will find this post useful, or maybe you got some new ideas of your own.
[update]
I’ve since completed this project and finished my internship at Little Chicken and graduated from school with a Bachelor of ICT and Game Design and Technology degree.
[/update]
Since the last update I have mainly been working on side projects. Recently my colleague finally had time to do an evaluation of my persistence layer project. The results are very satisfying. There were only a few comments on issues meriting further consideration.
Currently, every instance of an entity needs to be assigned a unique identifier to be persisted correctly. This is cumbersome to manage for the game developer and it might lead to mistakes and confusion. It was suggested to change this so that entities might be assigned a unique identifier automatically by the persistence layer.
This was something I did not consider at first, because I wanted the flexibility for the developer to be able to choose his own identifiers, but the idea is sound. My colleague pointed me to the GetInstanceID method on components which is ideal for this sort of thing and which I had previously overlooked somehow. There is only a trivial change required to implement this change.
With GetInstanceID it should also be possible to distinguish different Transform components, making persisting and restoring parts of the hierarchy an option again.
Unfortunately all the other issues with the hierarchy that I noticed before this have not disappeared. Restoring the hierarchy will still be a very complex issue, with a lot of potential for bugs and edge-cases that will be difficult to deal with, making the overall system less reliable.
I still feel that this feature is more of a ‘nice to have’, than something essential, so for now I will focus on polishing the rough edges, writing documentation, and the finishing touches on my thesis for school.
This was a question which confused me a bit. Why would you ever put more than one entity component on the same prefab? This way they can not be separated so they are effectively the same entity, which defeats the point of having multiple entity components. I could only conclude that it was a desire to organize things.
Due to the way this system is designed, dealing with this strange edge case is not possible, as the system would try to spawn two game objects from prefab while there should actually be only one.
While there are still a few things to be desired, the overall system works fine and fulfills its purpose. All that remains is to polish some rough edges and write documentation. I will also put the finishing touches on my thesis for school, which is nearing the deadline. After that, I might still have time to look at handling the hierarchy.
It’s been a while since the last update. The last month I have been working more on the main project, which successfully passed an important deadline. The past weeks I have been working on my own research and assignment. The first prototype has been well received and with this second prototype, the project is slowly nearing completion.
The past few weeks I have been expanding on this to create the second prototype, or iteration, for my Unity persistence layer. I detailed the major weaknesses of the first prototype in my previous post, along with some other considerations. The most important problems were solved in the second prototype, but there were some difficulties as well and some problems turned out to be impossible to solve reliably.
The biggest weakness of the original prototype was the fact that it was only able to fill existing entities with persistent data from storage and not able to instantiate new entities in the scene if this was required for the game. Initially, a work around was used to mitigate this problem.
In the new prototype, this problem has been solved by the addition of the Type property and the IEntityFactory interface. Developers using this persistence layer can implement an entity factory and plug it into the system to add enable instantiating dynamic entities.
This solution was chosen because, depending on the game and the design and implementation of game entities, instantiating an entity is likely to be quite complex. In Unity, game entities are likely to be inherited from the MonoBehaviour class, which means that they can not be instantiated normally. Instead, they usually need to be instantiated from a prefab, together with meshes, colliders and other components they are composed of.
The type property allows the EntityFactory to select the right prefab, even though the entity classes of different prefabs might be the same. For example, a red car and a blue car might each have their own prefab, but both are a Car entity. Note that entities do not HAVE to be inherited from MonoBehaviour and can also be plain old c# objects. In that case the factory can just ‘new’ an object like normal.
With dynamic entity instantiation, there occurs a related problem, namely the handling of references between entities. Since entities are instantiated elsewhere, we would need to override the serialization behavior to return references to these already existing entities. This is a very useful feature to have when dealing with collections of entities.
An appropriate example would be a Track entity which maintains a list of all TrackPiece entities.
This presented a bit of a problem because these references to entities might be embedded quite deep in the persistent data fields of an entity. This means that the serialization system needs to deal with this somehow. Whatever serialization mechanism is used needs a way to detect the presence of a reference to a game entity, and instead of trying to serialize it, must write the id of this entity, because the entity itself will be handled manually by the rest of the persistence layer. Upon loading, the serialization mechanism will again need to recognize that it should not attempt to deserialize references to entities in the normal way, but instead call back up to the persistence layer to obtain a reference to the entity with that id.
This was accomplished two of the three implemented encoders. In the JsonEncoder the JsonConverter class could be overridden to change the behaviour of the JsonSerializer.
Likewise, in the BinaryEncoder, the ISerializationSurrogate interface was used in a similiar way.
Unfortunately the XmlSerializer used by XmlEncoder did not support any feature like this and the more modern XmlObjectSerializer is not included in the version of Mono that ships with Unity, so this encoder does not support serialization of references between entities.
With dynamic entity instantiation, another problem that crops up is the scene hierarchy. In an variety of situations, it might be needed to restore an entity to its proper location in the hierarchy.
This feature was attempted, but abandoned due to several reasons.
Writing the hierarchy data did not prove to be a significant problem. Recursion was used to filter the transforms of all entities and their parents. These were written to the save file and loaded again correctly.
Unfortunately restoring the hierarchy in the scene properly proved impossible to do because of limitations in Unity. This stems from the fact that individual transforms in the scene do not have any unique identifiers. Different transforms can have the same names which leads to unpredictable behavior when loading since different transforms can not be distinguished from each other.
The only way to implement this would be to assign a unique identifier to each transform upon saving and upon loading to load every single one back into the scene. Obviously this does not work in cases where some entities are already defined in the scene editor as they would be duplicated instead of merely filled with the right data. This solution would make saving and loading an all-or-nothing approach and does not fit with Unity’s design philosophy in my opinion.
Another, less important reason to scrap this feature was that saving the entire hierarchy proved to save quite a bit of redundant data that might not be needed. Instead, having each entity manage it’s own location in the hierarchy if relevant was considered a better option. This option is less friendly to the developer but offers a lot more flexibility to the developer, who can make his own judgment on how to handle this issue on a case by case basis.
To enable easier integration with other systems, a change in the design was necessary to make the method of storage more accessible, so that parameters can more easily be changed and data can be exchanged. The new design is further described in the following section.
The design of the system was changed quite a bit compared to the initial design.
The IPersister and IPersister manager and implementing classes have been merged. This makes it easier to access the storage options or data from outside.
In addition, there is now an abstract base class StreamEncoder, which handles extracting the data from entities and instantiating them. Subclasses inheriting from StreamEncoder override abstract methods to implement serialization details and writing and reading all data to and from the stream. This separates the actual extraction and restoration work from the serialization method chosen, even though they are still tightly related.
The additional feature of handling references between objects required a change in the general algorithm for loading entities and restoring the scene. This now happens in two passes, first instantiating all entities, and then filling all entities with data and reconnecting references between entities.
 Evaluation
Since the original Workshop project is pretty much complete right now, testing these changes is better done somewhere else. Having a smaller project also helps with testing only the functionality of this system.
To test and evaluate this prototype, a new project was created containing a test scene with a collection of entities implemented to cover all functionality during testing. The following features were tested in the following ways:
Together this test scene and it’s contents covered all features I designed into this system. Static Balls are correctly restored to the right position on load. Spawned balls are instantiated correctly and restored to the the right position as well. All references among entities are restored correctly.
All strengths of the first prototype, plus the following:
The current system is usable for most of the use cases it is likely going to deal with. One exception is the use case for removed entities, which was not initially considered, but handling this should not be difficult so it will likely work in the final version. Overall the project seems on track, including my thesis which is slowly accumulating a nice amount of content.
The past weeks I have been working on working on some general gameplay functionality for the main project, in addition to further integration of the first prototype of my persistence layer. It is now possible to store the game state in a save slot on a server. I have also analyzed the current strengths and weaknesses of the system. The following diagram shows how it is designed:
 The most important parts are the IEntity interface which is implemented by game entities and enables them to mark fields to be persisted and to receive signals after loading and other persistence events. The bulk of the work is handled in the implementations of IStreamEncoder, of which currently only XmlEncoder is implemented and uses reflection and the XmlWriter and XmlSerializer classes to serialize the entities and their fields to an xml document. Which can be saved to a file, or somewhere else, by the IPersister.
I described the relevant problems and my chosen solutions in my previous post so I will not go into those here and now. I was mostly on the right track, and the overall system is working fine, though there are still quite a few points of improvement.
The current prototype is quite successful. It does the job and does it reliably, and has kept the persistence implementation of most game entities relatively simple. It has proven that the chosen solutions work for this problem. There are still aspects where it falls short, which should be addressed in the following iterations of new prototypes. Handling dynamic game entities and dependencies should have the highest priority right now.
